Free Shipping
 Extra Savings


How to Hang Canvas Prints Like a Pro: 5 Simple Methods
Listen to Content
A crooked canvas print can ruin an otherwise beautiful wall display, turning what should be a focal point into an eyesore that nags at you every time you walk by. The good news? Hanging canvas prints like a pro requires no special training or expensive equipment. Whether you're mounting a single statement piece or creating an elaborate gallery wall, the right technique makes all the difference between amateur hour and professional results. The five methods covered here range from simple nail-and-hammer approaches to heavy-duty solutions for oversized artwork. Each has its place depending on your wall type, canvas weight, and whether you're renting or own your space. Master these techniques once, and you'll approach every future hanging project with confidence instead of dread.
Essential Preparation and Wall Layout Tips
The difference between a professionally hung canvas and a crooked disaster often comes down to preparation. Rushing this stage leads to unnecessary holes, frustration, and results that look off, even when technically level.
Choosing the Right Height for Eye-Level Impact
Art galleries follow a consistent rule: center the artwork at a height of 57–60 inches from the floor. This height represents the average human eye level and creates comfortable viewing for most people. For rooms where you'll primarily be seated, such as dining areas or home offices, drop the center point to around 48-52 inches. Above furniture, maintain 6-8 inches of space between the top of a sofa or console and the bottom of your canvas. This creates a visual connection without crowding.
Marking Your Spot Without Damaging the Surface
Painter's tape becomes your best friend during layout. Place strips on the wall to outline your canvas dimensions before making any holes. For complex arrangements, cut paper templates matching each canvas size and tape them to the wall. Step back frequently to evaluate positioning from different angles and distances. This low-commitment approach lets you experiment freely until the arrangement feels right.
Gathering Your Tool Kit
Assemble everything before starting: a tape measure, a pencil, a level, a hammer, and appropriate hanging hardware. A stud finder proves invaluable for heavier pieces. Keep a small container nearby for screws and picture hooks so nothing gets lost. Having the right tools within reach prevents mid-project interruptions that break your focus and momentum.
Five Proven Methods for Securing Your Canvas
Different situations call for different approaches. A lightweight 8x10 canvas has different requirements than a 36x48 statement piece. Understanding when to use each method prevents damage to both your walls and your artwork.
The Classic Nail and Hammer Approach
For lightweight canvases under 5 pounds, a single nail works perfectly. Drive it into the wall at a 45-degree angle, which provides better holding power than going straight in. Position the nail so approximately half an inch remains exposed for hanging. This method works best when you can hit a wall stud, but drywall anchors extend its usefulness to any wall location.
Using Sawtooth Hangers for Precision
Sawtooth hangers attach to the back of your canvas frame and offer easy horizontal adjustment. Center the hanger on the top stretcher bar, ensuring it sits perfectly level. The serrated edge lets you shift the canvas left or right in small increments without rehanging. CanvasChamp canvas prints often come with pre-installed hanging hardware, making this step unnecessary.
Damage-Free Hanging with Adhesive Strips
Renters and commitment-phobes appreciate adhesive mounting strips. Modern versions hold surprising weight, with some rated for up to 20 pounds depending on wall conditions and strip size. Clean the wall surface with rubbing alcohol first, as dust and oils prevent proper adhesion. Press firmly for 30 seconds and wait at least an hour before hanging your canvas. These strips remove cleanly when you're ready to relocate, leaving no holes or residue behind.
Heavy-Duty Support with French Cleats
Large canvases demand serious support. French cleats consist of two interlocking pieces: one attached to the wall, one to the canvas. The angled cuts create a gravity-locked connection that distributes weight evenly. This system handles pieces weighing up to 100 pounds when properly installed into wall studs. The slight standoff from the wall also helps larger canvases hang flush and straight.
Achieving the Perfect Level and Alignment
Even properly secured artwork can look wrong if it's not level. Your eye notices tilts as small as one degree, making precision essential during final positioning.
The Secret to Using a Bubble Level
Digital levels offer exact readings, but a simple bubble level works just as well. Place it on top of your canvas frame after hanging, not against the wall behind it. Adjust until the bubble centers between the lines. For extra accuracy, check the level at both the top edge and across the middle of the canvas, as warped frames can give false readings at a single point.
Adjusting for Multi-Panel Canvas Sets
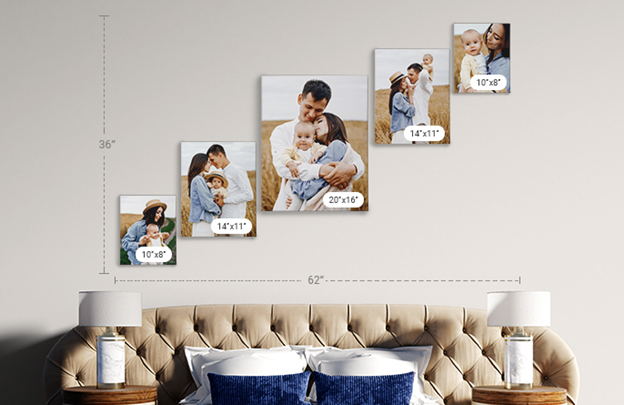
Split-image canvases require consistent spacing between panels. Use cardboard spacers to maintain identical gaps throughout your arrangement. Start with the center panel and work outward, checking the level at each addition. The cumulative effect of small errors becomes obvious in multi-panel displays, so take extra time with each piece.
Pro-Level Finishing Touches and Maintenance
Professional installations include details that homeowners often overlook. These finishing touches prevent future problems and keep your display looking sharp for years.
Using Bumper Pads to Prevent Scuffs
Adhesive felt or rubber pads attached to the bottom corners of your canvas frame serve two purposes. They prevent the frame from scratching your wall and help maintain the level by creating consistent spacing. These inexpensive additions also allow slight air circulation behind the canvas, reducing moisture buildup that could damage both the print and your wall over time.
Lighting Your Canvas for Maximum Visibility
Proper lighting transforms good art into stunning focal points. Picture lights mount directly above the frame and cast directed illumination downward. Track lighting offers flexibility for gallery walls with multiple pieces. Avoid placing canvases in direct sunlight, which causes fading over time. LED options provide bright, even light without the heat that can damage prints. CanvasChamp uses UV-resistant inks and premium materials, but protecting your investment from excessive light exposure remains a wise practice.
Frequently Asked Questions
How far apart should I space multiple canvas prints?
Standard gallery spacing runs 2-3 inches between frames. Tighter spacing creates a cohesive, grouped look, while wider gaps make each piece feel more independent. Consistency matters more than the exact measurement you choose.
Can I hang canvas prints on textured walls?
Yes, but adhesive strips perform poorly on heavily textured surfaces. Nail or screw-based methods work better. For brick or concrete, use masonry anchors rated for your canvas weight.
What's the best way to hang a canvas in a bathroom?
Humidity concerns make bathrooms tricky. Choose moisture-resistant hardware and ensure adequate ventilation. Consider removable adhesive options that let you take down artwork during extended showers. Avoid placing unsealed canvas directly above showers or tubs to prevent mold or warping from prolonged moisture exposure.
How do I fix a canvas that won't hang straight?
Check that your hanging hardware is centered on the frame. Adjust sawtooth hangers or add a second hanging point for better stability. Bumper pads often solve persistent tilting issues.
Should I use one hook or two for large canvases?
Canvases wider than 24 inches benefit from two hanging points spaced about two-thirds of the frame width apart. This prevents swinging and maintains level positioning over time.
Transform Your Walls with Confidence
Hanging canvas prints like a pro comes down to choosing the right method for your situation, taking time with preparation, and adding those finishing details that separate amateur from expert results. Whether you prefer the simplicity of adhesive strips or the heavy-duty reliability of French cleats, proper technique ensures your artwork stays secure and level for years. Ready to create your own gallery wall? CanvasChamp offers premium custom canvas prints at exceptional prices, with a lowest price guarantee and easy customization options that make bringing your favorite photos to life simple and affordable.